Distribustion lists which resolves in Outlook and works fine, will not directly add/use in SharePoint.
SharePoint Does not recoginize a DL until it should be added under Security Group in Active Directory.
For Example I have DL called ALL.EMP.This will works correctly and send email from the Outlook.
If You want to use this in SharePoint,You need to add this DL under Security group in AD.
Advantages:
One Shot you can add bulk users to Any Doc lib or Site.
Friday, October 28, 2011


SharePoint Site Collection Lock and Unlocking
Reasons for SharePoint Site Lock (Read only Mode)
1>Site Collection Backup cancelled or interrupted
2>Broken web part locks out SharePoint site
When upgrading a custom web part in SharePoint, it is REALLY important to uninstall the previous version of the web part and its referencing web pages or risk locking out all users including the Administrator from your website.
Impacts on the SharePoint site:
1> Site Collection will be turn into Read only mode.
Nothing can be saved.
2>All Farm administrators and site collection Administrator will get access denied on several pages like Create.aspx and AreaNavigation.aspx
3>You cannot able to add any user and not even you wont see the option to add user.
4>If you try to open through SharePoint designer it will open in Contributor mode(Content Author) and you cannot able to See code view and cannot copy or Modify any thing
Solution:
Go to Central Administration > Application Management > Site Collection Quotas and Locks
Select the Site Collection and chose the correct option to unlock the site as below.
Lock status for this site:
Not locked -- Select this option to unlock
Adding content prevented
Read-only (blocks additions, updates, and deletions)
No access
After Selecting the Option Not Lock, the issue will be resolved and you can able to view all the options :)
1>Site Collection Backup cancelled or interrupted
2>Broken web part locks out SharePoint site
When upgrading a custom web part in SharePoint, it is REALLY important to uninstall the previous version of the web part and its referencing web pages or risk locking out all users including the Administrator from your website.
Impacts on the SharePoint site:
1> Site Collection will be turn into Read only mode.
Nothing can be saved.
2>All Farm administrators and site collection Administrator will get access denied on several pages like Create.aspx and AreaNavigation.aspx
3>You cannot able to add any user and not even you wont see the option to add user.
4>If you try to open through SharePoint designer it will open in Contributor mode(Content Author) and you cannot able to See code view and cannot copy or Modify any thing
Solution:
Go to Central Administration > Application Management > Site Collection Quotas and Locks
Select the Site Collection and chose the correct option to unlock the site as below.
Lock status for this site:
Not locked -- Select this option to unlock
Adding content prevented
Read-only (blocks additions, updates, and deletions)
No access
After Selecting the Option Not Lock, the issue will be resolved and you can able to view all the options :)
Monday, October 17, 2011
SharePoint Site - "Create Page" not working
Issue Description:
The "Create Page" option on the site has stopped working for all access permissions. It gives the following error "Error: Access Denied".
Resolution:
Give read access to NT AUTHORITY\authenticated users for the Master pages and page layouts under Siteactions --> Site settings --> galleries
Site Usage Reports in SharePoint portals
Overview of usage reports
The following usage reports are available:
- Site usage report Site administrators, including administrators of the Shared Services Administration site, can view usage reporting for their site by clicking Site usage reports in the Site Administration section of the Site Settings page.
- Site collection usage report Site collection administrators for most site collections can view usage reporting by clicking Site collection usage reports in the Site Collection Administration section of the Site Settings page.
- Site collection usage summary Site collection administrators for the Shared Services Administration site and individuals with personal sites can view the Site Collection Usage Summary page by clicking Usage summary in the Site Collection Administration section of the Site Settings page.
Search usage reports are also available and can be used to improve the relevance of search results to improve discoverability and collaboration of your personalized content and sites.
View usage reports
The following information is available in usage reports for both sites and site collections:
- Usage summary view:
- Requests and queries in the last day and the last 30 days
- A site collection summary including the following information:
- Average number of requests per day over the last 30 days
- Number of distinct users over the past 30 days
- Number of distinct users yesterday
- Number of requests yesterday
- Number of queries yesterday
- Number of queries over the past 30 days
- Average number of requests per day over the last 30 days
- A chart of the average number of requests per day over the last 30 days
- A chart of requests per day over the last 30 days
- A list of the top page requests over the last 30 days
- A list of top users over the last 30 days
- A chart of top referring hosts over the last 30 days
- A chart of top referring pages over the last 30 days
- A list of top destination pages over the last 30 days
- Requests and queries in the last day and the last 30 days
- Requests view:
- A chart of the average number of requests per day over the last 30 days
- A chart of requests per day over the last 30 days
- A list of the top page requests over the last 30 days
- A chart of the average number of requests per day over the last 30 days
- Users view:
- A chart of unique users over the past 30 days
- A chart of the average number of unique users per day by month
- User activity over the last 30 days.
- A chart of unique users over the past 30 days
- Referrers view:
- A chart of top referring hosts over the last 30 days
- A chart of top referring pages over the last 30 days
- A chart of top referring hosts over the last 30 days
- Destination pages view:
- A list of top destination pages over the last 30 days
- Average requests per day over the past 30 days for the top destination pages
- A list of top destination pages over the last 30 days
- Home page view:
- Number of home page requests for the past 30 days
- Average home page requests per day by month
- Unique users for the home page over the past 30 days
- Average number of unique users per day by month
- Top referring pages to home page by average requests per day over the last 30 days
- Top destination pages from home page by average requests per day over the last 30 days
- Number of home page requests for the past 30 days
Site collection administrators, but not site administrators, can monitor usage data for search queries and search results for all sites in the site collection. Search usage reporting must be enabled. The following additional information is available in site collection usage reports:
- Additional information in the usage summary view:
- Top queries for the last 30 days
- Search results top destination pages
- Top queries for the last 30 days
- Search queries view:
- Number of queries per day over the previous 30 days
- Number of queries per month over the previous 12 months
- Top queries for the last 30 days
- Queries per search scope over the previous 30 days
- Number of queries per day over the previous 30 days
- Search results view:
- The top destination pages of search results
- Queries with zero results
- Most clicked best bets
- Queries with zero best bets
- The top destination pages of search results
View site collection usage summary page
The following information is available in the site collection usage summary that is available for the Shared Services Administration site and individual personal sites.
- Total amount of storage used by the site collection
- Percent of storage space used by Web Discussions
- Maximum storage space allowed
- Number of users for all sites in the hierarchy
- Total hits and recent bandwidth usage across all sites
OrgChart Webpart
AA OrgChart Webpart
It is commonly accepted that information can be better understood and digested visually rather than in verbal or written form. AASoftech’s organization charting products provide an intuitive and concise method to communicate organizational structure to executives, employees and senior managers.
AAOrgChartWebPart comprises of a very simple and intuitive user interface that allows easily search, locate, navigate and get essential contact information of employees and managers and find out reporting structure and hierarchy of an organization.
Three Level OrgChart
AAOrgChartWebPart consists of three connected web parts (Employee Locator, Employee Navigator and Organization Chart) that together provide main contact information and reporting structure of an organization.
AAOrgChartWebPart can be used in Windows SharePoint Services 2.0 as well as Windows SharePoint Services 3.0, SharePoint Portal Server 2003 and SharePoint Server 2007.
AAOrgChartWebPart is an HR solution used to create corporate organizational charts based on XML input data. It allows you to automatically examine your current employees’ information in an outlined format in an organization chart.
AAOrgChartWebPart can directly connect to SharePoint User Profile on SharePoint 2010 or MOSS (SharePoint Server 2007).
AAOrgChartWebPart also supports XML standard data format that can extracted from different databases (SQL, Oracle, DB2, and Access) or other files such as Excel. This allows organizations with different sizes be able to utilize their existing HR products (PeopleSoft, SAPs…) and provide input file for these web parts in XML format.
Download Url:
http://www.aasoftech.com/Products/OrgChartwebpart/Download.asp?product=WOP
It is commonly accepted that information can be better understood and digested visually rather than in verbal or written form. AASoftech’s organization charting products provide an intuitive and concise method to communicate organizational structure to executives, employees and senior managers.
AAOrgChartWebPart comprises of a very simple and intuitive user interface that allows easily search, locate, navigate and get essential contact information of employees and managers and find out reporting structure and hierarchy of an organization.
Three Level OrgChart
AAOrgChartWebPart consists of three connected web parts (Employee Locator, Employee Navigator and Organization Chart) that together provide main contact information and reporting structure of an organization.
AAOrgChartWebPart can be used in Windows SharePoint Services 2.0 as well as Windows SharePoint Services 3.0, SharePoint Portal Server 2003 and SharePoint Server 2007.
AAOrgChartWebPart is an HR solution used to create corporate organizational charts based on XML input data. It allows you to automatically examine your current employees’ information in an outlined format in an organization chart.
AAOrgChartWebPart can directly connect to SharePoint User Profile on SharePoint 2010 or MOSS (SharePoint Server 2007).
AAOrgChartWebPart also supports XML standard data format that can extracted from different databases (SQL, Oracle, DB2, and Access) or other files such as Excel. This allows organizations with different sizes be able to utilize their existing HR products (PeopleSoft, SAPs…) and provide input file for these web parts in XML format.
Download Url:
http://www.aasoftech.com/Products/OrgChartwebpart/Download.asp?product=WOP
This document resides in a document library that is not trusted.
Issue:
User created an OOB Approval workflow to get the approval for the doc.
when user clicking on the "EDIT THIS TASK" button from outlook window the user will get the below error message on the screen
"This document resides in a document library that is not trusted.
To participate in workflows on this document, add the document library to your list of trusted sites."
Resolution:
To resolve this issue, add the domain “*.contoso.net” to the Local Intranet Zone in IE browser settings.
Weird that SharePoint Site prompt username/password to access pages:
This problem can be bypassed by modifying some settings in IE. Specifically you need to add the SPS site to the list of sites in the Local Intranet Zone as follows.
1. Open IE
2. Click on Tools -> Internet Options
3. Select Security tab
4. Select Local Intranet Zone
5. Select Sites
6. Click Advanced
7. Add the base URL for your new SPS site to the list
8. Click OK
9. Click OK again.
Once this is done you need to configure IE to automatically log in using current username and password for sites in the Intranet Zone.
This will resolve the issue and user can able to approve the workflow from outlook.
User created an OOB Approval workflow to get the approval for the doc.
when user clicking on the "EDIT THIS TASK" button from outlook window the user will get the below error message on the screen
"This document resides in a document library that is not trusted.
To participate in workflows on this document, add the document library to your list of trusted sites."
Resolution:
To resolve this issue, add the domain “*.contoso.net” to the Local Intranet Zone in IE browser settings.
Weird that SharePoint Site prompt username/password to access pages:
This problem can be bypassed by modifying some settings in IE. Specifically you need to add the SPS site to the list of sites in the Local Intranet Zone as follows.
1. Open IE
2. Click on Tools -> Internet Options
3. Select Security tab
4. Select Local Intranet Zone
5. Select Sites
6. Click Advanced
7. Add the base URL for your new SPS site to the list
8. Click OK
9. Click OK again.
Once this is done you need to configure IE to automatically log in using current username and password for sites in the Intranet Zone.
This will resolve the issue and user can able to approve the workflow from outlook.
Tuesday, September 20, 2011
Step by Step procedures to Deploy SharePoint 3rd party Solutions in SharePoint
Step by Step procedures to Deploy SharePoint 3rd party Solutions in SharePoint:
Blog software installation steps in Share Point 2010
Steps:
Step1: Deploying the solution by using STSADM command
• Add Solution
• Deploy Solution
Step2: Enable the Blog features site Level in the Central Admin
Example: http://sp2010dev:10000/_layouts/settings.aspx (Central Admin)
Step3: Enable the Blog features at Site Collection Level.
Example:http://sp2010dev:15000/_layouts/ManageFeatures.aspx(Blog)
Step4: Enable OOB CKS themes on Blog Site (Modifying the Web.config File)
Note: We need to login with the Farm administrator Credentials in the server
Add CKS:EBE Solution:
1. Open the command line for the server.
2. If stsadm.exe is not on the path, change directory to the SharePoint BIN directory:
cd %PROGRAMFILES%\Common Files\Microsoft Shared\web server extensions\14\BIN
3. Add the solution to the farm by running the addsolution command:
Stsadm -o addsolution –filename c:\cks\cks.ebe.wsp
Note: Either copy the wsp file to the directory “C:\cks” or change the –filename value to the location of the wsp file
Deploy CKS: EBE Solution
1. Continuing from the command line above, run the command:
stsadm -o deploysolution -name cks.ebe.wsp -immediate -allowgacdeployment
Activate the Web Application feature
You can activate the web application feature of CKS: EBE using Central Administration
Central Administration Activation:
1. From SharePoint Central Administration browse to Application Management.
2. In the SharePoint Web Application Management section choose Manage Web application features.
3. If necessary, change the Web Application selector to your blog site Web application.
4. Click the Activate button next to CKS: EBE Web Application Feature.
or Browse directly this link and enable
(http://sp2010dev:10000/_layouts/ManageFeatures.aspx)
Activate the Site Feature
Site Administration Activation
1. Browse to your Blog site.
2. Choose Site Actions | Site Settings.
3. In the Site Administration section choose Site features.(http://sp2010dev:15000/_layouts/ManageFeatures.aspx)
4. On the Site Features page choose the Activate button next to CKS:EBE Extensions.
Note: If we enable the above two features in the Central Admin and Blog Site then only we will able to see the following Tag in the Web.config file
< add name="CksEbeModule" type="CKS.EBE.BlogHttpModule, CKS.EBE,Version=0.1.0.0,Culture=neutral,PublicKeyToken=3e8b700c069fb747" / >
We can see the changes on our SharePoint web server(s) after deploying the solution :
C:\Program Files\Common Files\Microsoft Shared\Web Server Extensions\14\TEMPLATE\FEATURES: Contains
CKS EBE
CKS EBE Themes
CKS EBE Webapp
C:\Windows\assembly: contains
CKS.EBE
CKS.EBE.SEARCH
C:\Program Files\Common Files\Microsoft Shared\Web Server extensions\14\TEMPLATE\LAYOUTS\cks\ebe:
Contains the utility pages like
Settings.aspx
TRACKBACK.ASPX
Enable OOB CKS themes on Blog Site:
Open web.config for Blog site and find the following line under section
< add name="CksEbeModule" type="CKS.EBE.BlogHttpModule, CKS.EBE,Version=0.1.0.0,Culture=neutral,PublicKeyToken=3e8b700c069fb747" / >
.
Go ahead and CUT that line above (we'll be pasting it somewhere else in a minute).
Next find the section simply labeled. In this section you will probably find 5 tags and 4 tags. Paste the "add" tag that you cut above so that it's after all the removes, but before the add's in the modules section. Also, you need to add a preCondition="integratedMode" attribute to this element. So, your whole section will look something like this (with your additions bolded below):
< modules runallmanagedmodulesforallrequests="true" >
< remove name="AnonymousIdentification" >
< remove name="FileAuthorization" >
< remove name="Profile" >
< remove name="WebDAVModule" >
< remove name="Session" >
< add name="CksEbeModule" precondition="integratedMode" type="CKS.EBE.BlogHttpModule, CKS.EBE, Version=0.1.0.0, Culture=neutral, PublicKeyToken=3e8b700c069fb747" >
< add name="SPRequestModule" precondition="integratedMode" type="Microsoft.SharePoint.ApplicationRuntime.SPRequestModule, Microsoft.SharePoint, Version=14.0.0.0, Culture=neutral, PublicKeyToken=71e9bce111e9429c" >
< add name="ScriptModule" precondition="integratedMode" type="System.Web.Handlers.ScriptModule, System.Web.Extensions, Version=3.5.0.0, Culture=neutral, PublicKeyToken=31bf3856ad364e35" >
< add name="SharePoint14Module" precondition="integratedMode" >
< add name="StateServiceModule" type="Microsoft.Office.Server.Administration.StateModule, Microsoft.Office.Server, Version=14.0.0.0, Culture=neutral, PublicKeyToken=71e9bce111e9429c" >
< add name="RSRedirectModule" type="Microsoft.ReportingServices.SharePoint.Soap.RSRedirectModule, RSSharePointSoapProxy, Version=10.0.0.0, Culture=neutral, PublicKeyToken=89845dcd8080cc91" >
< add name="PublishingHttpModule" type="Microsoft.SharePoint.Publishing.PublishingHttpModule, Microsoft.SharePoint.Publishing, Version=14.0.0.0, Culture=neutral, PublicKeyToken=71e9bce111e9429c" >
< /add > < /add > < /add > < /add > < /add > < /add > < /add > < /remove > < /remove > < /remove > < /remove > < /remove > < /modules >
Save and Close the Web.config file
After that open the url : http://server:port No/home.aspx
References :
http://cks.codeplex.com/releases/view/28520#DownloadId=130561
http://cks.codeplex.com/releases/view/28520#DownloadId=130559
http://www.thekickboard.com/archive/2010/07/24/running-cksebe-3-0-on-sharepoint-foundation-2010.aspx
Blog software installation steps in Share Point 2010
Steps:
Step1: Deploying the solution by using STSADM command
• Add Solution
• Deploy Solution
Step2: Enable the Blog features site Level in the Central Admin
Example: http://sp2010dev:10000/_layouts/settings.aspx (Central Admin)
Step3: Enable the Blog features at Site Collection Level.
Example:http://sp2010dev:15000/_layouts/ManageFeatures.aspx(Blog)
Step4: Enable OOB CKS themes on Blog Site (Modifying the Web.config File)
Note: We need to login with the Farm administrator Credentials in the server
Add CKS:EBE Solution:
1. Open the command line for the server.
2. If stsadm.exe is not on the path, change directory to the SharePoint BIN directory:
cd %PROGRAMFILES%\Common Files\Microsoft Shared\web server extensions\14\BIN
3. Add the solution to the farm by running the addsolution command:
Stsadm -o addsolution –filename c:\cks\cks.ebe.wsp
Note: Either copy the wsp file to the directory “C:\cks” or change the –filename value to the location of the wsp file
Deploy CKS: EBE Solution
1. Continuing from the command line above, run the command:
stsadm -o deploysolution -name cks.ebe.wsp -immediate -allowgacdeployment
Activate the Web Application feature
You can activate the web application feature of CKS: EBE using Central Administration
Central Administration Activation:
1. From SharePoint Central Administration browse to Application Management.
2. In the SharePoint Web Application Management section choose Manage Web application features.
3. If necessary, change the Web Application selector to your blog site Web application.
4. Click the Activate button next to CKS: EBE Web Application Feature.
or Browse directly this link and enable
(http://sp2010dev:10000/_layouts/ManageFeatures.aspx)
Activate the Site Feature
Site Administration Activation
1. Browse to your Blog site.
2. Choose Site Actions | Site Settings.
3. In the Site Administration section choose Site features.(http://sp2010dev:15000/_layouts/ManageFeatures.aspx)
4. On the Site Features page choose the Activate button next to CKS:EBE Extensions.
Note: If we enable the above two features in the Central Admin and Blog Site then only we will able to see the following Tag in the Web.config file
< add name="CksEbeModule" type="CKS.EBE.BlogHttpModule, CKS.EBE,Version=0.1.0.0,Culture=neutral,PublicKeyToken=3e8b700c069fb747" / >
We can see the changes on our SharePoint web server(s) after deploying the solution :
C:\Program Files\Common Files\Microsoft Shared\Web Server Extensions\14\TEMPLATE\FEATURES: Contains
CKS EBE
CKS EBE Themes
CKS EBE Webapp
C:\Windows\assembly: contains
CKS.EBE
CKS.EBE.SEARCH
C:\Program Files\Common Files\Microsoft Shared\Web Server extensions\14\TEMPLATE\LAYOUTS\cks\ebe:
Contains the utility pages like
Settings.aspx
TRACKBACK.ASPX
Enable OOB CKS themes on Blog Site:
Open web.config for Blog site and find the following line under
< add name="CksEbeModule" type="CKS.EBE.BlogHttpModule, CKS.EBE,Version=0.1.0.0,Culture=neutral,PublicKeyToken=3e8b700c069fb747" / >
.
Go ahead and CUT that line above (we'll be pasting it somewhere else in a minute).
Next find the section simply labeled
< modules runallmanagedmodulesforallrequests="true" >
< remove name="AnonymousIdentification" >
< remove name="FileAuthorization" >
< remove name="Profile" >
< remove name="WebDAVModule" >
< remove name="Session" >
< add name="CksEbeModule" precondition="integratedMode" type="CKS.EBE.BlogHttpModule, CKS.EBE, Version=0.1.0.0, Culture=neutral, PublicKeyToken=3e8b700c069fb747" >
< add name="SPRequestModule" precondition="integratedMode" type="Microsoft.SharePoint.ApplicationRuntime.SPRequestModule, Microsoft.SharePoint, Version=14.0.0.0, Culture=neutral, PublicKeyToken=71e9bce111e9429c" >
< add name="ScriptModule" precondition="integratedMode" type="System.Web.Handlers.ScriptModule, System.Web.Extensions, Version=3.5.0.0, Culture=neutral, PublicKeyToken=31bf3856ad364e35" >
< add name="SharePoint14Module" precondition="integratedMode" >
< add name="StateServiceModule" type="Microsoft.Office.Server.Administration.StateModule, Microsoft.Office.Server, Version=14.0.0.0, Culture=neutral, PublicKeyToken=71e9bce111e9429c" >
< add name="RSRedirectModule" type="Microsoft.ReportingServices.SharePoint.Soap.RSRedirectModule, RSSharePointSoapProxy, Version=10.0.0.0, Culture=neutral, PublicKeyToken=89845dcd8080cc91" >
< add name="PublishingHttpModule" type="Microsoft.SharePoint.Publishing.PublishingHttpModule, Microsoft.SharePoint.Publishing, Version=14.0.0.0, Culture=neutral, PublicKeyToken=71e9bce111e9429c" >
< /add > < /add > < /add > < /add > < /add > < /add > < /add > < /remove > < /remove > < /remove > < /remove > < /remove > < /modules >
Save and Close the Web.config file
After that open the url : http://server:port No/home.aspx
References :
http://cks.codeplex.com/releases/view/28520#DownloadId=130561
http://cks.codeplex.com/releases/view/28520#DownloadId=130559
http://www.thekickboard.com/archive/2010/07/24/running-cksebe-3-0-on-sharepoint-foundation-2010.aspx
Monday, September 19, 2011
Enable Access Requests in the SharePoint Site Collections
Enable Access Requests in the SharePoint Site Collection (Allow requests for access):
Scenario:
You are a SharePoint Administrator for XYZ Company. You are maintaining Many Share Point Sites in the SP portal.
You created many sites as per the Business requirement based on the Departments in the Organization.
Example:
Https://server/sites/HR/
Https://server/sites/IT/
Https://server/sites/Sales/
Https://server/sites/Marketing/
Each Site collection will be having one Primary Administrator and Secondary Administrator. These people should take care all the access requests for the particular Site.
In this Scenario the SharePoint Administrator will Enable the Access Requests with the Primary and Secondary Administrators Details i.e Email ids
Navigation Path: Site >Site Settings > Permissions
Under Permissions > Settings > Access Requests
or
Hint: Direct Access Request Page: Https://server/sites/IT/_layouts/setrqacc.aspx
Scenario:
You are a SharePoint Administrator for XYZ Company. You are maintaining Many Share Point Sites in the SP portal.
You created many sites as per the Business requirement based on the Departments in the Organization.
Example:
Https://server/sites/HR/
Https://server/sites/IT/
Https://server/sites/Sales/
Https://server/sites/Marketing/
Each Site collection will be having one Primary Administrator and Secondary Administrator. These people should take care all the access requests for the particular Site.
In this Scenario the SharePoint Administrator will Enable the Access Requests with the Primary and Secondary Administrators Details i.e Email ids
Navigation Path: Site >Site Settings > Permissions
Under Permissions > Settings > Access Requests
or
Hint: Direct Access Request Page: Https://server/sites/IT/_layouts/setrqacc.aspx
Sunday, June 6, 2010
Customizing the list using the Share Point Designer


Monday, March 8, 2010
Creating SSP through Stsadm in Share Point
In order to create Shared service provider (SSP) in Share Point we need to have one MYSITE and one web application.
Creating MYSITE:
stsadm.exe -o extendvs -url http://hanuman:1010 -ownerlogin hanuman\administrator -owneremail rameshbabu@gmail.com -exclusivelyusentlm -databaseserver hanuman -databasename contdb1010 -donotcreatesite -apcreatenew -apidname app1010 -apidtype configurableid -apidlogin hanuman\administrator -apidpwd hanuman
Creating Web app:
stsadm.exe -o extendvs -url http://HANUMAN:1020 -ownerlogin hanuman\administrator -owneremail rameshbabu@gmail.com -exclusivelyusentlm -databaseserver hanuman -databasename MySiteContentDB2 -donotcreatesite -apcreatenew -apidname MySiteAppPool2 -apidtype configurableid -apidlogin hanuman\administrator -apidpwd hanuman
By using those two web apps url's we are going to create a ssp:
Creating SSP:
stsadm.exe –o createssp –title SSP12 -url http://HANUMAN:1020 -mysiteurl http://hanuman:1010 -ssplogin hanuman\administrator -indexserver hanuman -indexlocation "C:\Program Files\Microsoft Office Servers\12.0\Data\Office Server\Applications" -ssppassword hanuman -sspdatabaseserver hanuman -sspdatabasename sspdb1
Here i have given INDEX SERVER as my app server and Index Location:C:\Program Files\Microsoft Office Servers\12.0\Data\Office Server\Applications
after that we need to do a IISRESET
Now SSP is created in Central administratin.By clicking on the ssp tab it will redirect to the web app url:http://hanuman:1020/ssp/admin/default.aspx [http://HANUMAN:1020] and

if we click on MYSITE option in any site collection we will redirect to the MYSITE url :http://hanuman:1010/personal/administrator/default.aspx [http://hanuman:1010]

Tuesday, February 16, 2010
Changing Service Account Password in the MOSS 2007
Changing Service Account Password in the MOSS 2007
1>Change Service account password in AD
2>Change the password in all the services that running under Service Account in the services.msc ..
3>Click on the services and go to log on tab and change the password for all the services that are running under Service Account
4>Open INETMGR:
Change the application pool identity with the new password.
5>Run the following commands to update service account password in the MOSS Server
stsadm -o updateaccountpassword -userlogin abc\ramesh -password <> -noadmin
stsadm -o spsearch -farmserviceaccount abc\ramesh -farmservicepassword <>
stsadm -o spsearch -farmcontentaccessaccount abc\ramesh -farmcontentaccesspassword <>
stsadm -o updatefarmcredentials -userlogin abc\ ramesh -password <>
stsadm.exe -o editssp -title SSP_1 -ssplogin abc\ ramesh -ssppassword <>
stsadm.exe -o osearch -farmserviceaccount abc\ amesh -farmservicepassword <>
Issues I faced after changing the password in the MOSS2007 :
I changed the Password in all the places(Services) in my Server .But I faced a issue like service account was getting locked very oftenly.
Troubleshooting :
Checked whether any Scheduled tasks are running in the server with service account .
Deleted the Saved old passwords with in the server by using the command rundll32.exe keymgr.dll krshowkeymgr and remove those saved old Passwords.
Checked for any other application is using my service account details.
We already set the property for the People picker to Communicate to the AD .after that again I changed that property with the new Password and I run that stsadm setproperty again .
After that its started working fine with out locking.
1>Change Service account password in AD
2>Change the password in all the services that running under Service Account in the services.msc ..
3>Click on the services and go to log on tab and change the password for all the services that are running under Service Account
4>Open INETMGR:
Change the application pool identity with the new password.
5>Run the following commands to update service account password in the MOSS Server
stsadm -o updateaccountpassword -userlogin abc\ramesh -password <> -noadmin
stsadm -o spsearch -farmserviceaccount abc\ramesh -farmservicepassword <>
stsadm -o spsearch -farmcontentaccessaccount abc\ramesh -farmcontentaccesspassword <>
stsadm -o updatefarmcredentials -userlogin abc\ ramesh -password <>
stsadm.exe -o editssp -title SSP_1 -ssplogin abc\ ramesh -ssppassword <>
stsadm.exe -o osearch -farmserviceaccount abc\ amesh -farmservicepassword <>
Issues I faced after changing the password in the MOSS2007 :
I changed the Password in all the places(Services) in my Server .But I faced a issue like service account was getting locked very oftenly.
Troubleshooting :
Checked whether any Scheduled tasks are running in the server with service account .
Deleted the Saved old passwords with in the server by using the command rundll32.exe keymgr.dll krshowkeymgr and remove those saved old Passwords.
Checked for any other application is using my service account details.
We already set the property for the People picker to Communicate to the AD .after that again I changed that property with the new Password and I run that stsadm setproperty again .
After that its started working fine with out locking.
Migrating Users from One Domain to Another Domain
STSADM Commands:
Migrate User:
Scenarios:
1> Migrating users from One domain to another Domain
2> Changing the Display name or user name or email id.
Migrating Users from one domain to another domain. This may be due to decommission of the old domain or temporary domains.
Sometimes you may need to change your display name.
C:\Program Files\Common Files\Microsoft Shared\web server extensions\12\BIN>
stsadm.exe -o migrateuser
-oldlogin
-newlogin
[-ignoresidhistory]
Stsadm.exe –o migrateuser –oldlogin xyz\Ramesh –newlogin abc\Ramesh -ignoresidhistory
By using this we can maintain the old login permissions with the new login in the migrated domain.
Stsadm.exe –o migrateuser –oldlogin xyz\Ramesh –newlogin xyz\RameshBabu –ignoresidhistory
We need to add the – ignoresidhistory must to run this command as it will ignore the previous SID history.
Migrate User:
Scenarios:
1> Migrating users from One domain to another Domain
2> Changing the Display name or user name or email id.
Migrating Users from one domain to another domain. This may be due to decommission of the old domain or temporary domains.
Sometimes you may need to change your display name.
C:\Program Files\Common Files\Microsoft Shared\web server extensions\12\BIN>
stsadm.exe -o migrateuser
-oldlogin
-newlogin
[-ignoresidhistory]
Stsadm.exe –o migrateuser –oldlogin xyz\Ramesh –newlogin abc\Ramesh -ignoresidhistory
By using this we can maintain the old login permissions with the new login in the migrated domain.
Stsadm.exe –o migrateuser –oldlogin xyz\Ramesh –newlogin xyz\RameshBabu –ignoresidhistory
We need to add the – ignoresidhistory must to run this command as it will ignore the previous SID history.
Sunday, September 20, 2009
Global Admin Access to Users:
Some times we need to give Full Control to the Specific Users to access all the site collections in the Farm. At that time it is not Possible to go to each and every sitecollections and give Full Control to all the site Collections.
Moss 2007 Provides the Option Called Policy for the Web application where we can add the user to access all the Site Collections with specific Permissions.
Steps:
Central Administration-->application management-->under application Security Tab-->Policy for the Web application->Add Users -->Need to select the Zones-->Next-->

Moss 2007 Provides the Option Called Policy for the Web application where we can add the user to access all the Site Collections with specific Permissions.
Steps:
Central Administration-->application management-->under application Security Tab-->Policy for the Web application->Add Users -->Need to select the Zones-->Next-->

Sunday, May 10, 2009
Step by step approach to Excel Services Administration
Excel Services Administration:
1. Introduction Excel Services.
2. Publishing Excel to SharePoint.
2.1 Creating Trusted file locations.
3. Excel Web Access (EWA) Web part.
4. Creating Trusted Data Connection Libraries
5. Trusted Data Providers.
6. User -defined function assemblies.
1. Introduction Excel Services.
Excel Calculation Services is part of Microsoft's business intelligence (BI) platform provided by Microsoft Office SharePoint Server 2007 Enterprise Edition. Excel Calculation Services supports the server-side loading, recalculation, and rendering of Office Excel 2007 workbooks in a browser-based version. It addresses a problem faced by many organizations in which users work with large Excel workbooks that contain complex formulas to generate data values. When the files are stored on a file server, these workbooks can take a long time to load and recalculate on a workstation. With Excel Calculation Services, the workbook file is stored in a SharePoint Server document library, thereby allowing Excel Calculation Services to calculate the results on the server. Excel Calculation Services then renders the results in a Web browser by generating an HTML version of the spreadsheets and charts in the workbook. This functionality allows users who do not have Office Excel 2007 installed on their workstation to view the information. In addition, Excel Calculation Services can provide a single location where users work with spreadsheets, preventing the need and desire to share spreadsheets via e-mail. This functionality assists some organizations with regulatory compliancy and presents a single version of the truth.
1. Introduction Excel Services.
2. Publishing Excel to SharePoint.
2.1 Creating Trusted file locations.
3. Excel Web Access (EWA) Web part.
4. Creating Trusted Data Connection Libraries
5. Trusted Data Providers.
6. User -defined function assemblies.
1. Introduction Excel Services.
Excel Calculation Services is part of Microsoft's business intelligence (BI) platform provided by Microsoft Office SharePoint Server 2007 Enterprise Edition. Excel Calculation Services supports the server-side loading, recalculation, and rendering of Office Excel 2007 workbooks in a browser-based version. It addresses a problem faced by many organizations in which users work with large Excel workbooks that contain complex formulas to generate data values. When the files are stored on a file server, these workbooks can take a long time to load and recalculate on a workstation. With Excel Calculation Services, the workbook file is stored in a SharePoint Server document library, thereby allowing Excel Calculation Services to calculate the results on the server. Excel Calculation Services then renders the results in a Web browser by generating an HTML version of the spreadsheets and charts in the workbook. This functionality allows users who do not have Office Excel 2007 installed on their workstation to view the information. In addition, Excel Calculation Services can provide a single location where users work with spreadsheets, preventing the need and desire to share spreadsheets via e-mail. This functionality assists some organizations with regulatory compliancy and presents a single version of the truth.
2. Publishing Excel to SharePoint.
Step1:Open the Excel and select the Publish Option --> Excel Services
Step1:Open the Excel and select the Publish Option --> Excel Services
 Step:2
Select the SharePoint site Document Library where you want to Publish the Excel Work Book
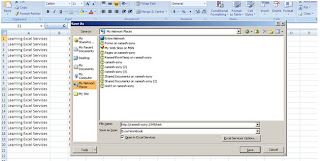
Step3: save the Excel Work Book

Step4: The result will be like this after clicking the Save Button

So we need to Configure the Trusted file location to upload our Excel workbooks.
step1:
Central Administration-->Shared service Provider-->Excel Service Settings-->Trusted File Locations
 Step2:
Click on Add Trusted File Locations
 Step3:
here we need to give the SharePoint site document Library URL:http://servername/testdoclib/

step4:
Now Open the Excel and Go to Publish-->Excel Services-->Open the SharePoint Document Library Location which is trusted and save the Same ..
Now we are able to Publish the Excel in the SharePoint as follows.

3 Excel Web Access (EWA) Web part.
Excel Web Access is the component of SharePoint Server that renders Office Excel 2007 workbook content in HTML format in a Web browser. One of the innovations of Excel Web Access is that all of the conversion is done on the server so that no Active X controls or other binary objects are delivered to the browser. Excel Web Access allows users to open an entire workbook in their Web browser and, through the Excel Web Access Web Part, to display selected objects from workbooks on a dashboard page.
NOTE: Before start using the Excel web part access we need to upload A Excel file in to one of the Document Library and that Document Library Should be in the Trusted File Location (Refer 2.1) then only we will able to see the Excel file in the EWA . Otherwise we will get error.
Step1:Site Actions-->Edit Page -->Add the Excel Web Access Web Part

Step2:Select the Excel Book From the SharePoint Document Library.

Step3:
Case1. if the SharePoint Document library is not added in the Trusted File Location then we will get this error .

Then add the SharePoint Document Library in the Trusted FileLocation. and will try to add the same in the EWA(Excel Web Access).will display as follows .

4. Creating Trusted Data Connection Libraries:
An Office Data Connection (ODC) is a persistent set of data connection settings that can be stored in an Office Excel 2007 workbook or in SharePoint Server for use in multiple workbooks. ODCs allow users to create their own queries into databases in the organization and to extract data and display it in their Office Excel 2007 workbooks. Although it is possible to query any database table and display the results in a workbook using an ODC, dynamic tables derived from standard databases are not supported by Excel Calculation Services. Excel Calculation Services can only refresh and display data derived from an Analysis Services query.
1> Site Actions-->Create-->Data Connection Library.

Add the Connections to the Connection Document Library.

Step:2Add the DataConnection Library to the Trusted Data Connection Library in the Central Administration .
Central Administration-->Shared Service Provider -->Excel Service Settings-->Trusted Data Connection Library

5. Trusted Data Providers:

6. working with UDF'S(User Defined Functions):
Step1:Class Library--> Add the Microsoft.office.Excel.server.Udf in the References--> Build the Application.
Step2: Go to Central Admin and click on SSP(Shared service Provider)--> Under Excel Services Settings -->User-defined function assemblies.
Step3: Add User-Defined Function Assembly
Assembly Name --> C:\UDFs\excelex1.dll
Assembly Location--> file Path
Enable Assembly--> select the Check box

Step4:
Now open the new Excel Sheet … and write the method name in one cell as
=Mydouble(B1) and in the B1 cell enter any value. Now publish the excel into the SharePoint site.

Step5:
After publishing the excel into SharePoint site the Excel Calculation Engine will calculate the value and displays the same in the cell.

Subscribe to:
Posts (Atom)