Here i have given INDEX SERVER as my app server and Index Location:C:\Program Files\Microsoft Office Servers\12.0\Data\Office Server\Applications
after that we need to do a IISRESET
Now SSP is created in Central administratin.By clicking on the ssp tab it will redirect to the web app url:http://hanuman:1020/ssp/admin/default.aspx [http://HANUMAN:1020] and
if we click on MYSITE option in any site collection we will redirect to the MYSITE url :http://hanuman:1010/personal/administrator/default.aspx [http://hanuman:1010]
Changing Service Account Password in the MOSS 2007
1>Change Service account password in AD
2>Change the password in all the services that running under Service Account in the services.msc ..
3>Click on the services and go to log on tab and change the password for all the services that are running under Service Account
4>Open INETMGR:
Change the application pool identity with the new password.
5>Run the following commands to update service account password in the MOSS Server
Issues I faced after changing the password in the MOSS2007 :
I changed the Password in all the places(Services) in my Server .But I faced a issue like service account was getting locked very oftenly. Troubleshooting :
Checked whether any Scheduled tasks are running in the server with service account .
Deleted the Saved old passwords with in the server by using the command rundll32.exe keymgr.dll krshowkeymgr and remove those saved old Passwords.
Checked for any other application is using my service account details.
We already set the property for the People picker to Communicate to the AD .after that again I changed that property with the new Password and I run that stsadm setproperty again .
After that its started working fine with out locking.
Scenarios:
1> Migrating users from One domain to another Domain
2> Changing the Display name or user name or email id.
Migrating Users from one domain to another domain. This may be due to decommission of the old domain or temporary domains.
Sometimes you may need to change your display name.
Some times we need to give Full Control to the Specific Users to access all the site collections in the Farm. At that time it is not Possible to go to each and every sitecollections and give Full Control to all the site Collections.
Moss 2007 Provides the Option Called Policy for the Web application where we can add the user to access all the Site Collections with specific Permissions.
Steps:
Central Administration-->application management-->under application Security Tab-->Policy for the Web application->Add Users -->Need to select the Zones-->Next-->
1. Introduction Excel Services.
2. Publishing Excel to SharePoint.
2.1 Creating Trusted file locations.
3. Excel Web Access (EWA) Web part.
4. Creating Trusted Data Connection Libraries
5. Trusted Data Providers.
6. User -defined function assemblies.
1. Introduction Excel Services.
Excel Calculation Services is part of Microsoft's business intelligence (BI) platform provided by Microsoft Office SharePoint Server 2007 Enterprise Edition. Excel Calculation Services supports the server-side loading, recalculation, and rendering of Office Excel 2007 workbooks in a browser-based version. It addresses a problem faced by many organizations in which users work with large Excel workbooks that contain complex formulas to generate data values. When the files are stored on a file server, these workbooks can take a long time to load and recalculate on a workstation. With Excel Calculation Services, the workbook file is stored in a SharePoint Server document library, thereby allowing Excel Calculation Services to calculate the results on the server. Excel Calculation Services then renders the results in a Web browser by generating an HTML version of the spreadsheets and charts in the workbook. This functionality allows users who do not have Office Excel 2007 installed on their workstation to view the information. In addition, Excel Calculation Services can provide a single location where users work with spreadsheets, preventing the need and desire to share spreadsheets via e-mail. This functionality assists some organizations with regulatory compliancy and presents a single version of the truth.
2. Publishing Excel to SharePoint.
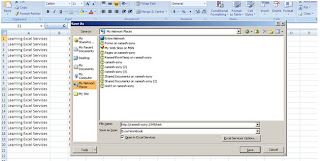
Step1:Open the Excel and select the Publish Option --> Excel Services
Step:2
Select the SharePoint site Document Library where you want to Publish the Excel Work Book
Step3: save the Excel Work Book
Step4: The result will be like this after clicking the Save Button
So we need to Configure the Trusted file location to upload our Excel workbooks.
2.1 Adding Trusted file locations in the Central Administration .
step1:
Central Administration-->Shared service Provider-->Excel Service Settings-->Trusted File Locations
Step2:
Click on Add Trusted File Locations
Step3:
here we need to give the SharePoint site document Library URL:http://servername/testdoclib/
step4:
Now Open the Excel and Go to Publish-->Excel Services-->Open the SharePoint Document Library Location which is trusted and save the Same ..
Now we are able to Publish the Excel in the SharePoint as follows.
3Excel Web Access (EWA) Web part.
Excel Web Access is the component of SharePoint Server that renders Office Excel 2007 workbook content in HTML format in a Web browser. One of the innovations of Excel Web Access is that all of the conversion is done on the server so that no Active X controls or other binary objects are delivered to the browser. Excel Web Access allows users to open an entire workbook in their Web browser and, through the Excel Web Access Web Part, to display selected objects from workbooks on a dashboard page.
NOTE: Before start using the Excel web part access we need to upload A Excel file in to one of the Document Library and that Document Library Should be in the Trusted File Location (Refer 2.1) then only we will able to see the Excel file in the EWA . Otherwise we will get error.
Step1:Site Actions-->Edit Page -->Add the Excel Web Access Web Part
Step2:Select the Excel Book From the SharePoint Document Library.
Step3:
Case1. if the SharePoint Document library is not added in the Trusted File Location then we will get this error .
Then add the SharePoint Document Library in the Trusted FileLocation. and will try to add the same in the EWA(Excel Web Access).will display as follows .
4.Creating Trusted Data Connection Libraries:
An Office Data Connection (ODC) is a persistent set of data connection settings that can be stored in an Office Excel 2007 workbook or in SharePoint Server for use in multiple workbooks. ODCs allow users to create their own queries into databases in the organization and to extract data and display it in their Office Excel 2007 workbooks. Although it is possible to query any database table and display the results in a workbook using an ODC, dynamic tables derived from standard databases are not supported by Excel Calculation Services. Excel Calculation Services can only refresh and display data derived from an Analysis Services query.
Add the Connections to the Connection Document Library.
Step:2Add the DataConnection Library to the Trusted Data Connection Library in the Central Administration .
Central Administration-->Shared Service Provider -->Excel Service Settings-->Trusted Data Connection Library
5. Trusted Data Providers:
6.working with UDF'S(User Defined Functions):
Step1:Class Library--> Add the Microsoft.office.Excel.server.Udf in the References--> Build the Application.
Step2:Go to Central Admin and click on SSP(Shared service Provider)--> Under Excel Services Settings -->User-defined function assemblies.
Step3: Add User-Defined Function Assembly
Assembly Name --> C:\UDFs\excelex1.dll
Assembly Location--> file Path
Enable Assembly--> select the Check box
Step4:
Now open the new Excel Sheet … and write the method name in one cell as
=Mydouble(B1) and in the B1 cell enter any value. Now publish the excel into the SharePoint site.
Step5:
After publishing the excel into SharePoint site the Excel Calculation Engine will calculate the value and displays the same in the cell.


 Step:2


 Step2:
 Step3:


